



468x60 Ads

Buanglah sampah pada tempatnya. Pabila sampah tiada, kena ceria main warnet. Hary Irfantri, 2012
Demo image Demo image Demo image Demo image Demo image >

Things you didn’t know VLC media player can do

0 comments

For most people, VLC is the favorite media player because it plays everything they throw at it without hiccups. No hunting for codec. But VLC can do a lot of other things as well. Find out how many of these listed below you knew, and how many you did not.
1. Rip DVDs: VLC includes a basic DVD ripper. You probably would never use it when there are better DVD rippers available, but it helps to know that you can in fact, get a decent quality DVD rip with VLC. To rip a movie follow these steps:
  • Go to the Media menu and choose Convert/Save. Click on the Disc tab.
  • Here you can adjust the Starting Position and rip only specific titles or chapters.
  • Enter file name making sure to end with .MPG, and start ripping.
  • Click Save.
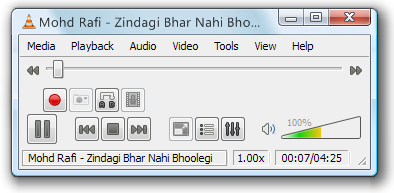
2. Record videos: With the new VLC, you can record videos during playback. The record button is hidden by default. To see it, click on View>Advanced Control. The record button will now appear. Clicking on the button while playing a movie or video will start recording. Clicking again will stop recording.
vlc-record
3. Play RAR files: Do you know VLC can play videos zipped inside RAR files? They play like normal video files and you can even use the seek bar. If the RAR file is split into several files, no problem. Just load the first part (.part001.rar ) and it will automatically take the rest of the parts and play the whole file.
4. Play in ASCII mode: VLC media player has an amusing ability, to playback movies in ASCII art. To enable ASCII mode, open VLC media player and click on Tools>Preferences. Open the section “Video” section and under “Output” select “Color ASCII art video output” from the drop down menu. Save it. Now play any video file to enjoy the ASCII art.
vlc-ascii2
5. Listen to online radio: VLC includes hundreds of Shoutcast radio stations. You just need to enable it through Media>Services Discovery>Shoutcast radio listings. Now, open the Playlist and browse through the stations.
vlc-shoutcast
6. Convert Audio and Video formats: In VLC you can convert video and audio files from one format to another. Several different formats are supported like MP4, WMV, AVI, OGG, MP3 etc. To access the converter:
  • Go to Media>Convert/Save.
  • Load the file you want to convert using the Add button and click Convert.
  • Now choose the output format and output file location.
    vlc-convert
7. Download YouTube and other online videos: First grab the URL of the YouTube video page. Now click on Media>Open Network stream. Paste the URL and click Play.
Once VLC starts streaming the video, click Tools>Codec Information and at the bottom of the window you will see a Location box. Copy the URL and paste it on your browser’s address bar. The browser will now download the file which you can save it to your hard disk. Alternatively, you can record the video. (See #2).

iMacsoft Free DVD Ripper For Windows is The Best You Can Get For Free

0 comments

iMacsoft Free DVD Ripper is a totally free DVD ripping program for Windows with features usually seen only in commercial products.
I have reviewed a fair number of DVD ripping programs in the past – a majority of them happens to be paid software. When compared to freeware DVD ripping programs, the commercial programs always had an edge over the free ones. They always had a better interface, had exhaustive support for media file formats and built in profiles for different portable devices and media players. I was eager to see a free DVD ripper that was at least half as decent as the paid ones.
imacsoft-dvd-ripper
iMacsoft Free DVD Ripper is not half as decent – it’s a full replacement for every expensive DVD ripping program out there. The software comes with fantastic support for portable devices, user configurable video settings, a video trimming tool, and other features which we shall see shortly.
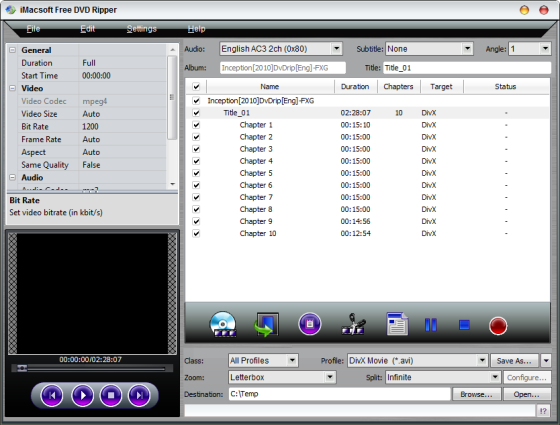
iMacsoft Free DVD Ripper can rip videos from either a physical disc, a disc image or a DVD folder on the hard drive. Just load the DVD or DVD folder into the program and it will automatically list all available titles and chapters on the disc. If the disc contains multiple angles, a feature typically found on porn DVDs, you can extract them too. No other DVD ripping program that I’ve tried till date offered this function.
imacsoft-dvd-ripper2
The next step would be to select the output video format. These are grouped into common video, common audio, iPhone, iPad, PS2, PS3, mobile phone, Windows mobile etc. Each of these groups contain multiple different formats. Practically, all video formats are supported.
If you intend on ripping a DVD and burning it again on to a disk, you can choose to split the video file into 650 MB, 700 MB, 4.7 GB or any custom sized chunks. The video trimming tool lets you set a start and end position on the video file, and only the marked segment will be ripped. This is useful to get rid of advertisement at the beginning of the video and end credits at the end. This in turn reduces the file size of the ripped video.
You can also choose the zoom level – letterbox, pan and scan or full.
On the left, is a small preview window which is basically a video player that lets you preview the video files before ripping. Above the preview window, you will find the video settings. These can be directly clicked on and edited. You can change the video size, bit rate, aspect ration, frame rate, and quality (variable or constants bit rate).
Once you have gone through the above steps, all that remains is to click on the red button to commence ripping.

Open Source Media Player Miro 5 Released

0 comments

MiroOpen source music, video and Internet TV player Miro 5 has just been upgraded to version 5. With this upgrade Miro brings several new features to the already rich media player such as a tool to lookup missing music information and album art, a means to cleanup their music library, download HD videos from Vimeo, faster device synchronization and conversion and support for purchasing music from eMusic.
Miro plays all your video and music in your local drive as well as stream videos from YouTube, Vimeo, Hulu, PBS, DailyMotion, 5min, Blip, Metavid and more. Miro can automatically download videos from RSS-based channels and add them to your library from where you can watch them later. Miro integrates an RSS news aggregator and podcatcher and a BitTorrent client.
miro

Then there is a built in Video Converter, that converts video based on FFmpeg with profiles for the Theora (.ogv), .mp4, and WebM video formats supported by various devices. Converted videos can be copied to your portable devices and mobile phones and the contents synchronized with those on your computer.
These are the stuff that is already available in Miro since version 4. With version 5, you get additional capabilities the most notable one is song information and album art lookup and music clean up which is done automatically by looking up the artist, correct title, and album name and artwork on the Echonest database. The album art comes from 7Digital.
Also added is eMusic to the music store which includes Amazon Music and Google Music.
Transferring of media files to playback devices has further improved as Miro 5 can now automatically sync files, and users can set what media type they would like Miro to fill the remaining space on their player with. The program can now also delete files from the device that have already expired in Miro. Another helpful addition is that Miro 5.0 will no longer convert videos to another format when the device it will be synced to actually supports the original format.
The programs core files also received “massive updates to the Windows backend”, from playback to GUI, display to libtorrent, everything is updated and upgraded.

0 comments

Download KMPlayer 3.2.0.19

KMPlayer 3.2.0.19

KMPlayer - 27.50MB (Freeware)
The KMPlayer is a versatile media player which can cover various types of container format such as VCD, DVD, AVI, MKV, Ogg Theora, OGM, 3GP, MPEG-1/2/4, WMV, RealMedia, and QuickTime among others. It handles a wide range of subtitles and allows you to capture audio, video, and screenshots in many ways.
The player provides both internal and external filters with a fully controlled environment in terms of connections to other splitters, decoders, audio/video transform filters and renderers without grappling with the DirectShow merit system. Internal filters are not registered to user's system to keep it from being messed up with system filters.
In December 2008 KMPlayer was bought by Pandora.tv, and continues to be made available as freeware.

0 comments

TweakNow PowerPack 2012 v4.1.0

Optimise, repair, tweak and tune your PC with this one-stop system management suite
Our Rating:
Your Rating:
Login to rate
Based on 1 ratings
License: Freeware
Operating Systems: Windows 7 (32 bit), Windows 7 (64 bit), Windows Vista (32 bit), Windows Vista (64 bit), Windows XP
Requirements:
Languages: English
Software Cost: Free
Date Updated: 19 April 2012
Watchlist: Add download to my watchlist
Downloads To Date: 2062
Developer: TweakNow
RSS News Feed:
Buy TuneUp Utilities 2012 for only $14.99, with lifetime license, saving 70% from MSRP, only from store.downloadcrew.com
TweakNow PowerPack 2012
Keep your PC in peak condition
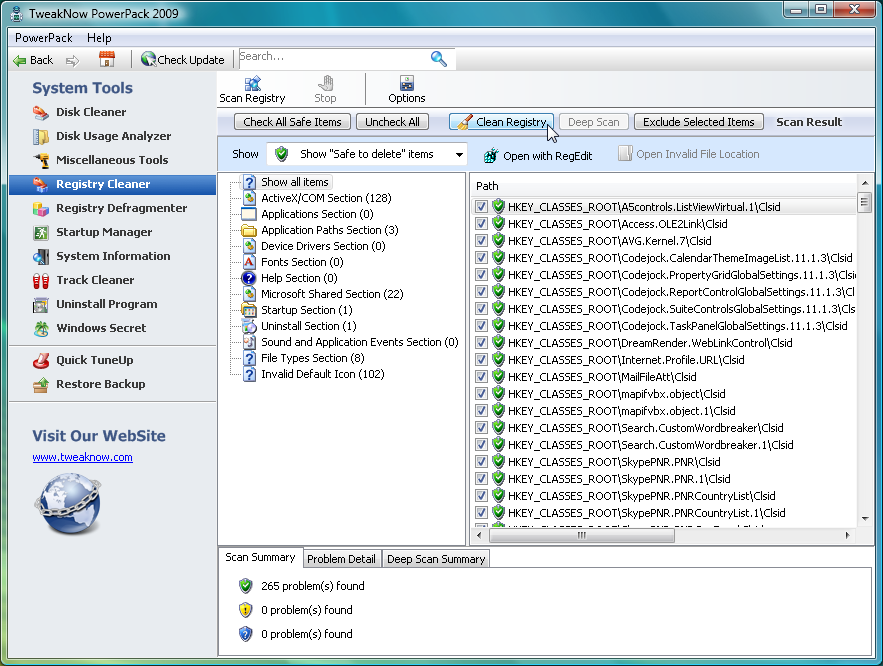
Keeping your PC in peak condition normally requires installing a whole library of utilities, learning their individual quirks and hoping that they'll somehow all work together. But there is a simpler alternative. TweakNow PowerPack 2009 provides all the PC management and tweaking tools you need through one straightforward interface, so there's no wasted time, no software conflicts - you just get to work immediately with the utility you need.
If hard drive space is short, for instance, then the Disk Usage Explorer will reveal the most bloated folders, helping you to quickly address the problem. Or you could just set the Disk Cleaner to work, finding and deleting any redundant files that are cluttering your hard drive.
If you're more worried about performance then turn to the Startup Manager, which helps you control exactly which programs launch when Windows boots. Your Registry is kept in order with a Cleaner and Defragmenter, while a RAM Optimizer frees up memory when you need it.
Anyone concerned about privacy will appreciate the Track Cleaner, which removes the application history for browsers (IE, Firefox, Chrome), Explorer, Windows Media Player, Microsoft Office, and more.
You also get a complete Windows tweaking tool, that lets you change everything from Windows memory management strategies, to your network settings, Start menu appearance and more.
And there are still more tools that don't fit easily into other categories, like an auto shutdown module (turn off your PC at a given time) and a virtual desktop (have up to 4 desktops available and switch between them with a system tray icon).
PowerPack 4.1.0 adds these new features:
-Windows Cleaner -> Disk Usage Analyzer: Improved disk scan engine performance.
-Windows Cleaner -> Disk Usage Analyzer: Added report for common files (bmp, png, jpg, wav, etc) found during disk scan process.
-General: minor improvements and bug fixes.

0 comments

Penjelasan tentang Rundll32.exe, Kerusakan dan Cara Memperbaikinya.

rundll32.exeApa itu rundll32.exe? Itulah pertanyaan pertama yang harus kita pahami jawabannya sebelum kita bisa memperbaiki kerusakan pada file ini. Proses rundll32.exe adalah bagian dari OS Windows yang bertanggung jawab untuk menjalankan DLL dan menempatkan libraries dalam memori. Proses rundll32.exe dikenal sebagai program utilitas command line, dan melakukan fungsinya terintegrasi bersama dengan file rundll.exe. Rundll32.exe bekerja dengan menerapkan suatu fungsi yang diekspor dari modul DLL yang spesifik yaitu 16bit atau -32-bit. Proses rundll32.exe adalah pengembangan dari Run DLL.
Fungsi rundll32.exe merupakan program internal yang digunakan oleh Windows untuk menjalankan program-program internal lainnya yang belum dikenal sebagai DLL (dynamic link libraries) yang dibutuhkan oleh sistem operasi dan program-program anda (misalnya Word, Outlook, Internet Explorer, OpenOffice, Thunderbird, Firefox, atau apapun agar berfungsi). Program-program seperti ini dibebankan kepada DLL dan dibawah ke dalam memori dan kemudian memicu fungsi tertentu dari modul DLL.
Mengapa Rundll32.exe bisa error?
Error pada Rundll32.exe biasanya terjadi dalam menanggapi ketidakmampuan Windows untuk mengakses aplikasi, program atau file sebagai hasil dari sebuah file (Dynamic Link Library) yang rusak atau hilang atau sebagai respons terhadap adanya virus rundll32.exe yang dirancang untuk terlihat seperti sebuah proses Windows yang normal. Penyebab yang lain dari kerusakan rundll32 adalah karena proses install dan uninstall yang tidak sempurna sehingga menyebabkan system jadi crash.
Bagaimana mengatasi Rundll32.exe Errors
Ada beberapa cara yang dapat ditempuh untuk memperbaiki kerusakan ini;
  1. Cara otomatis dengan software. Cara mudah untuk memperbaikinya adalah dengan menggunakan sebuah software yang disebut sebagai RegCure Registry Cleaner. Sayangnya bahwa software ini berbayar dan saya pikir anda pasti akan menghindari ini.
  2. Dengan cara manual, yaitu dengan mengerjakan beberapa langkah-langkah perbaikan.
  3. Jika sudah sangat buntu, jalan terakhir adalah install repair atau install total.
Hot to Fix the “Windows Cannot Find C:WindowsRundll32.exe” Error
  1. Kadang-kadang ketika file rundll32.exe hilang, corrupted atau terinfeksi virus, anda mungkin mendapatkan pesan seperti ini: “Windows cannot find C:WindowsRundll32.exe. Make sure you typed the name correctly and try again”.
  2. Pertama-tama, scan komputer Anda dengan program antivirus yang handal untuk menyingkirkan setiap infeksi virus yang mungkin ditemukan. Namun, jika sebuah file rundll32.exe hilang atau rusak yang menyebabkan masalah, coba dulu mencari file rundll32.exe di folder C:Windowssystem32dllcache. Jika masih ada di sana, silakan copy dan pindahkan ke lokasi C:Windowssystem32.
  3. Jika dalam folder dllcache juga tidak ada, silakan cari di C:WindowsSericePackFilesi386 dan copy ke tempat yang saya maksud diatas.
Jika 3 langkah diatas masih gagal, lakukan proses berikut ini;
  1. Masukkan disk installer Windows kedalam CD/DVD ROM drive.
  2. Klik [Start] dan pilih [Run…].
  3. Ketik; [expand f:i386rundll32.ex_ c:windowssystem32rundll32.exe] dalam box Run tadi lalu tekan [Enter] maka proses peng-copy-an akan berjalan
  4. Setelah proses 3 diatas selesai, reboot computer anda dan tes hasilnya.
  5. Proses selesai dan the problem should be solved.
Catatan:
  1. Adakalanya ketika file rundll32.exe terinfeksi virus, justru computer tidak mau shutdown. Cara mengatasinya adalah delete dulu file rundll32 yang terinfeksi virus lalu copy kembali dari cd installer.
  2. Seharusnya setelah cara kedua diatas selesai, maka masalah akan hilang. Tetapi jika karena sesuatu hal tidak juga selesai, maka jalan berikut yang bisa ditempuh adalah install repair atau instalasi total system operasi.

0 comments

Download Update Offline AVG AntiVirus Terbaru (25 April 2012)


Download Update Offline AVG AntiVirus Terbaru (25 April 2012) - Untuk memberikan perlindungan terbaik bagi pengguna setia AVG AntiVirus, GRISOFT terus mengembangkan dan memperbaharui definitions update dari AVG untuk mengenali beberapa jenis virus terbaru. Update virus database dengan tepat waktu merupakan merupakan sebuah anjuran untuk setiap program antivirus. Untuk melakukannya, sobat dapat melakukan update secara online maupun offline sesuai kebutuhan dan tentunya kemampuan koneksi internet masing-masing pengguna.

Jika sobat bukan pengguna internet aktif dan memiliki banyak kesibukan diluar dunia maya, sangat dianjurkan untuk melakukan updatedatabase antivirus secara manual atau update offline. Ini bertujuan untuk terus memastikan bahwa AVG Antivirus bekerja secara maksimum melindungi PC sobat dari jenis virus terbaru. Karena ini merupakan solusi terbaik untuk keamanan komputer / PC, maupun laptop sobat.Update virus database yang tepat waktu merupakan komponen kritis untuk efektivitas program antivirus.

  • Varian baru dari trojan Downloader.Small
  • Penambahan deteksi varian baru dari I-Worm/Stration
  • Clicker

  1. Save update ke temporary location
  2. Open AVG control center
  3. Pilih tombol update pada bagian bawah
  4. Kemudian tombol pilih folder, lalu ikuti petunjuk sampai AVG sobat telah melakukan update antivirus defenitions terbaru

Update Offline AVG AntiVirus Definitions Update Terbaru 25 April 2012


tombol download


0 comments

Masalah Komputer Tidak Ada Suara

suara komputer menghilangTidak ada sound audio, atau tidak ada suara komputer atau apapun namanya yang jelas musik tidak mengeluarkan suara pada Windows bisa terjadi karena banyak faktor. Kerusakan sound audio komputer bisa terjadi jika Anda meng-upgrade ke versi Windows baru atau ketika Anda menginstal ulang sistem operasi Windows Anda. Program perangkat audio akan melaporkan kesalahan bahwa suara tidak ada. Audio Device Windows akan menunjukkan tidak ada perangkat audio dan semua opsi akan berwarna abu-abu tidak bisa diklik. Dalam kebanyakan kasus Anda perlu menginstal perangkat audio untuk mendapatkan kembali audio komputer.
Semua hardware yang terhubung ke perangkat di Windows menggunakan device driver untuk memastikan Windows dapat berkomunikasi dengan perangkat keras itu. Jadi penyebab paling umum untuk kesalahan perangkat audio adalah bahwa driver audio tidak diinstal, atau rusak.
Dalam menghadapi masalah audio komputer ini, selalu mulai dengan menginstal atau menginstal ulang driver audio Anda. Jika Anda memiliki CD driver, cukup jalankan setup driver audio dari CD. Jika tidak, download driver audio dari situs produsen dan jalankan installer driver audio dari file yang didownload. Jika Anda tidak mengetahui produsen dan model kartu suara, Anda dapat menggunakan program driver finder yang secara otomatis akan mendeteksi kartu suara dan mencari driver yang cocok untuk Anda.
Jika kartu suara terintegrasi dalam motherboard, Anda perlu menginstal driver chipset motherboard dan  bukan sebuah driver kartu suara yang terpisah. Umumnya motherboard chipset adalah Intel, AMD, Via, Sis, dan Nvidia. Petunjuk dalam artikel ini menggunakan Windows XP sebagai contoh, tetapi semua tips berlaku pada Windows, termasuk Vista dan Windows 7, walaupun langkah-langkah dapat bervariasi sedikit.
Bagaimana mengecek audio device
  1. Silakan buka [Control Panel -> System -> Hardware] (ini relatif sesuai versi windows anda).
  2. Pada  [Device Manager], lihat bagian [Sound, video and game controllers].komputer tidak bersuara
  3. Di sini Anda akan menemukan merek perangkat audio berdasarkan produsen chipset perangkat audio. Dalam contoh ini kita lihat mereknya adalah Realtek, tetapi contoh lain dari produsen perangkat audio ada juga C-Media, Creative, Turtle Beach dan Yamaha.
  4. Jika perangkat memiliki tanda tanya berwarna kuning maka berarti ada masalah dengan konfigurasi perangkat atau driver. Jika tidak ada perangkat tersebut, perangkat audio mungkin tidak diakui, dan Anda tidak akan menemukan driver perangkat lain di bawah kategori Sound, video dan kategori game. Sekali lagi, ini sebagian besar disebabkan oleh driver yang hilang. Instal driver yang tepat untuk menginstal perangkat audio.tidak ada suara
  5. Dari gambar diatas, klik kanan udio device (atau unknown device) dalam Device Manager dan pilih [Properties].suara komputer hilang
  6. Hal pertama yang harus diperiksa adalah [Device usage] apakah kolom dibawahnya bertuliskan [Use this device (enable)], jika tidak berarti disini penyebab audio hilang.
  7. Selanjutnya pilih tab [Properties] dan buka grup [Audio Devices].hilang suara komputer
  8. Kliktombol [Properties] untuk membuka jendela audio device properties. Pada jendela ini, pastikan radio button [Use audio features on this device] terseleksi, kemudian klik [OK] untuk menutup jendela audio properties. audio komputer hilang
  9. Selanjutnya, perhatikan dengan baik jendela gambar dibawah ini, pilih tab [Driver].hilang audio komputer
  10. Di sini Anda dapat melihat rincian driver saat ini jika ada, dan memulai wizard [Update Driver] serta [Roll Back Driver]. Roll Back Driver dapat membantu jika Anda baru-baru ini memperbarui sebuah driver audio dan suara berhenti bekerja setelah itu. Windows menyimpan salinan dari driver sebelumnya, yang dapat dipulihkan oleh rolling kembali driver.
  11. Dalam hal tidak ada suara, tidak ada salahnya anda menggunakan fasilitas [[Update Driver] untuk mengatasi masalah anda.
Pemilihan Sound Card Komputer
Jika komputer Anda memiliki kartu audio onboard, dan Anda ingin menggunakan kartu suara yang terpisah (pci), pastikan Anda menonaktifkan perangkat suara onboard di BIOS komputer. Jika tidak, ini akan jadi sumber konflik perangkat audio yang tidak terdeteksi, atau tidak akan bekerja dengan baik.
Bila Anda menggunakan perangkat audio USB, masalahnya mungkin berhubungan dengan port USB dan tidak langsung perangkat audio. Periksa perangkat USB Anda atau baca artikel Cara Mengatasi Masalah USB Device Not Recognized yang pernah saya tulis.
Pengaturan Sound pada Control Panel
Selain dari [Device Manager],[ Sounds and Audio Devices] di Control Panel Windows dapat bermanfaat dalam usaha untuk memperbaiki masalah audio Anda namun itu akan dibahas diwaktu yang akan datang.